

Your gate operator always seems to fail at the worst possible time – when you’re running late for work, during a rainstorm, or when you have guests arriving. What starts as a minor inconvenience quickly becomes an expensive emergency repair call, often costing hundreds more than it would have if you’d caught the problem early.
The good news is that gate operators rarely fail without warning – they give you clear signs that trouble is coming, and you don’t need technical expertise to spot them. Most gate failures develop over weeks or months, showing symptoms like unusual sounds, sluggish movement, or inconsistent responses to your remote. Learning to recognize these early warning signs can save you from costly emergency repairs and keep your property secure.
A few simple checks of your gate’s movement, sounds, and electrical components can reveal potential problems before they leave you stranded. Here’s how to catch the warning signs before your gate operator gives up.
Step 1: Listen For Unusual Noises
Your gate operator should run quietly with just the gentle hum of the motor. Any new grinding, squealing, or changes in sound patterns typically signal mechanical stress or component wear that needs attention.
Grinding, Squealing, Or Humming Sounds
Grinding noises indicate metal-on-metal contact where lubrication has failed or parts are misaligned. You’ll often hear this when the gate struggles against resistance in the tracks or when roller bearings start wearing down.
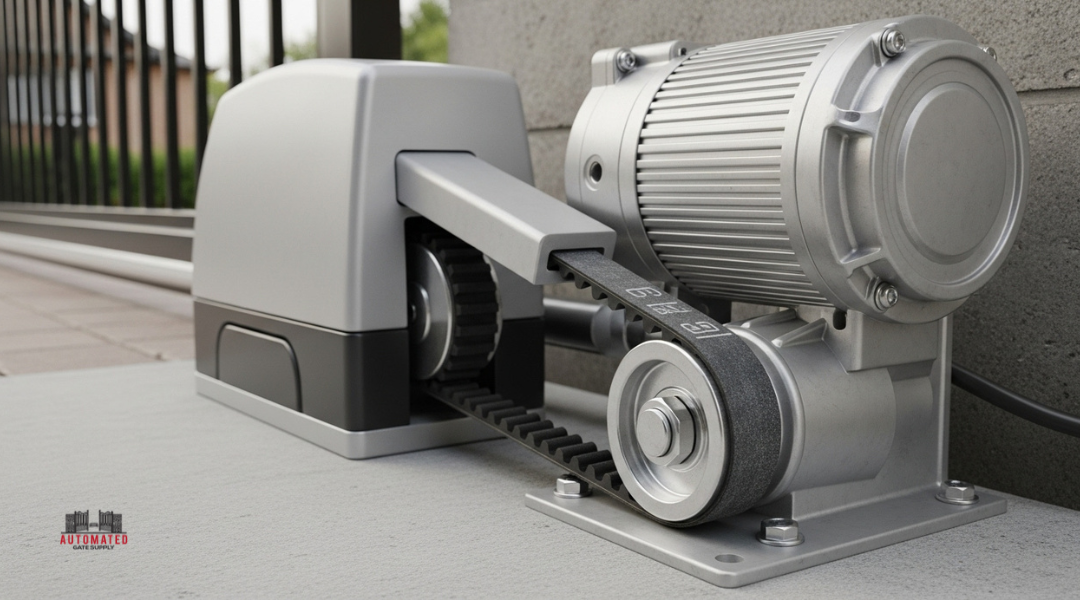
Squealing sounds usually point to belt tension problems or worn drive components. The noise happens when rubber belts slip or stretch beyond their normal operating range.
Changes in motor humming tell you about electrical issues. A motor that hums louder than usual or makes intermittent buzzing sounds may be drawing more power to overcome mechanical resistance.
Listen specifically during the opening and closing cycles. Note if the sounds occur at particular points in the gate’s travel. Grinding at the beginning of movement suggests track problems, while noises throughout the cycle often mean motor or drive system issues.
Check if the sounds happen in both directions or just one. This helps pinpoint whether the problem affects the entire system or specific components.
Why New Noises Often Mean Wear Or Strain
New sounds develop when your gate operator works harder than designed. Components that previously moved smoothly now create friction, vibration, or electrical resistance.
Mechanical wear creates gaps where parts no longer fit precisely together. Bearings develop rough spots, tracks accumulate debris, and moving parts lose their smooth operation.
Lubrication breakdown causes previously quiet components to scrape against each other. Gate operators depend on proper lubrication to reduce friction and prevent premature wear.
Increased system strain forces the motor to work harder, changing its normal sound signature. This happens when gates become misaligned, tracks get damaged, or weather strips create excessive drag.
Early detection matters because small problems quickly escalate. A slightly worn bearing becomes a completely failed component within weeks if not addressed promptly.
Step 2: Watch How The Gate Moves
A properly functioning gate should move smoothly and predictably every time. When operators begin to fail, changes in movement patterns are often the first visible warning signs.
Slowing Down Or Jerky Motion
Your gate should maintain consistent speed throughout its opening and closing cycle. If you notice the movement becoming sluggish or uneven, this indicates developing mechanical problems.
Motor strain is the most common cause of slowing gates. The motor works harder when components wear down or become misaligned. This extra effort creates heat buildup that can damage internal parts permanently.
Watch for these specific movement issues:
- Stuttering motion during operation
- Variable speeds within a single cycle
- Grinding sounds paired with slow movement
- Pausing at certain points along the track
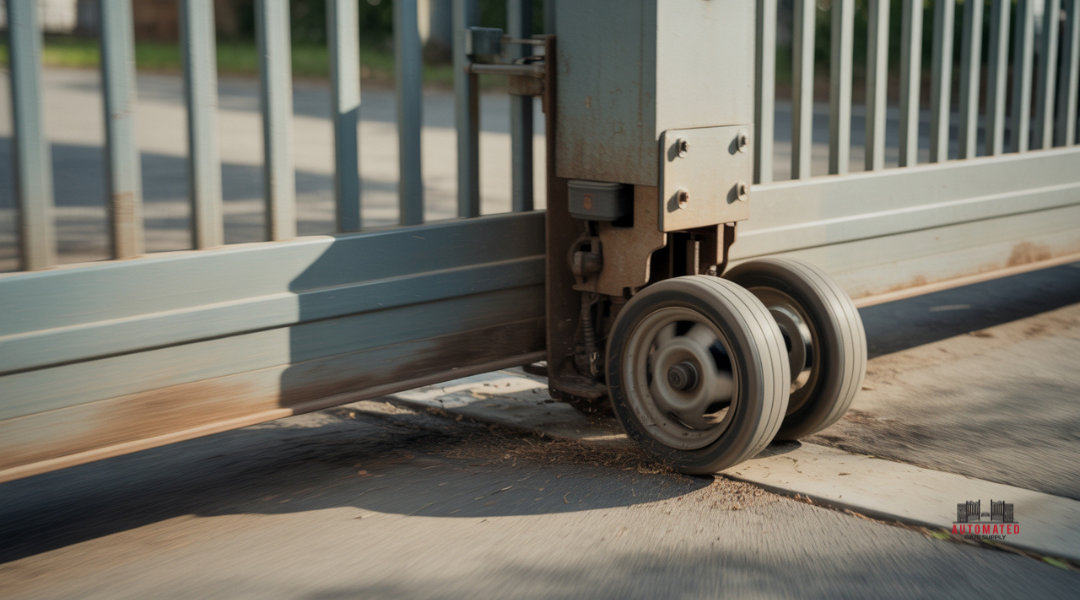
Jerky movement often stems from track obstruction or wheel problems. Debris accumulation forces the gate to work around obstacles. Worn wheels create uneven contact with tracks, causing bumpy operation.
Environmental factors also affect movement quality. Cold weather thickens lubricants, while heat expands metal components. However, a well-maintained system should handle normal temperature variations without significant performance changes.
Address movement irregularities quickly. What starts as minor sluggishness often progresses to complete motor failure within weeks or months.
Stopping Halfway Or Reversing Unexpectedly
Gates that stop mid-cycle or reverse direction without cause signal serious operator malfunctions. These behaviors indicate safety system activation or component failure.
Safety sensor issues trigger most unexpected reversals. Infrared sensors detect phantom obstructions due to dirt buildup, misalignment, or electrical interference. The gate reverses to prevent assumed collisions.
Limit switch problems cause halfway stopping. These switches tell the operator when the gate reaches fully open or closed positions. Faulty switches send incorrect signals, confusing the control system.
Power supply fluctuations also create erratic behavior:
- Voltage drops cause sudden stops
- Electrical surges trigger safety protocols
- Loose connections interrupt power flow intermittently
Mechanical binding forces emergency stops. Warped gates, damaged tracks, or seized components create resistance that overwhelms the motor. The system shuts down to prevent damage.
Track these behavioral patterns carefully. Note whether problems occur at specific positions or times of day. Temperature-related issues appear during extreme weather, while electrical problems happen randomly.
Document each incident with details about gate position, weather conditions, and any accompanying sounds. This information helps technicians diagnose root causes efficiently.
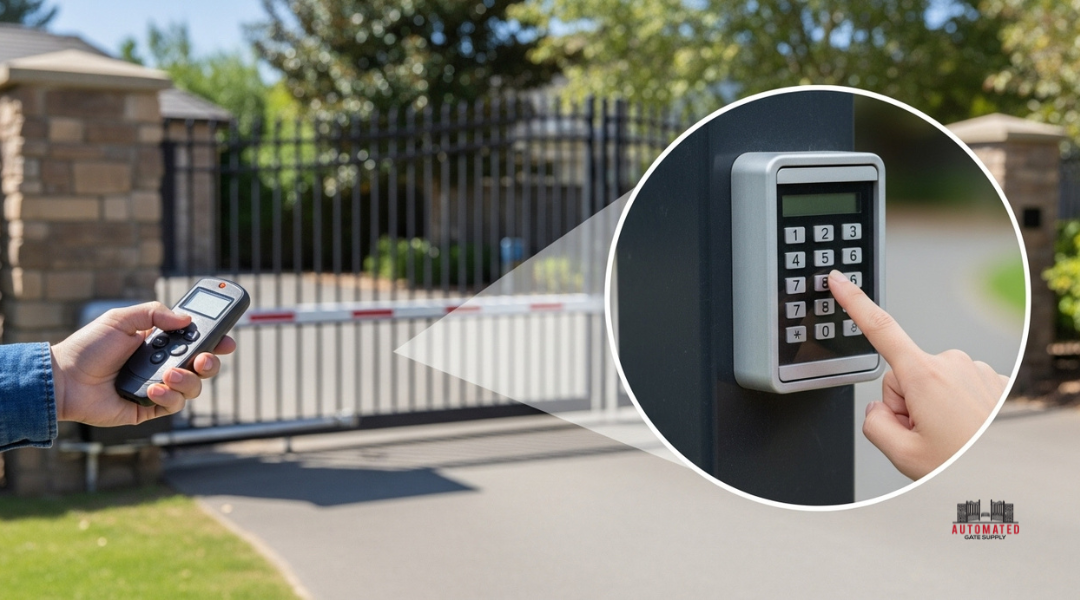
Step 3: Test Remotes And Keypads
Your remotes and keypads often show the first signs of gate operator trouble through reduced range or sluggish response times. These warning signals typically appear weeks before complete system failure occurs.
Shorter Range Or Delayed Response
When you notice your remote working only from closer distances than usual, your gate operator may be developing receiver problems. A healthy gate system should respond consistently from at least 50-100 feet away.
Test your remote from multiple distances throughout your driveway. Mark the spots where it stops working reliably. If that range shrinks over time, your operator’s receiver unit might be failing.
Common distance warning signs:
- Remote works only within 20-30 feet (previously worked from 75+ feet)
- Inconsistent response from the same location
- Need to press the button multiple times
Delayed response is equally concerning. Your gate should start moving within 1-2 seconds of pressing the remote button. If you’re counting to three or four before seeing movement, the control board may be struggling.
Check your keypad response time too. Enter your code and time how long before the gate reacts. Delays longer than 3-4 seconds suggest internal processing issues that will likely worsen.
When A Simple Battery Swap Isn’t Enough
Fresh batteries should restore full remote range and instant response. If new batteries don’t solve the problem, your gate operator’s receiver components are likely degrading.
Test multiple remotes if you have them. When all remotes show the same reduced performance with fresh batteries, the issue lies within the operator itself, not the transmitters.
Signs pointing to operator failure:
- New batteries provide no improvement
- Multiple remotes affected simultaneously
- Keypad also responds slowly or intermittently
Look for physical damage to the operator’s antenna. A bent, corroded, or loose antenna connection can mimic failing electronics. However, if the antenna appears intact and connections are secure, internal receiver failure is probable.
Document these changes in a simple log. Note dates when you first notice range reduction or response delays. This information helps technicians diagnose problems faster and can prevent complete system breakdowns.
Step 4: Check Safety Sensors And Wiring
Safety sensors prevent your gate from closing on people, pets, or objects, while proper wiring keeps everything connected and functioning. These components often show warning signs through misalignment, dirt buildup, or visible wire damage before they completely fail.
Misaligned Or Dirty Photo Eyes
Photo eye sensors create an invisible beam across your gate opening. When something breaks this beam, the gate stops or reverses direction.
Check if the sensors point directly at each other. You should see small LED lights on each sensor – one red and one green when properly aligned. If the lights blink or stay red, the sensors are misaligned.
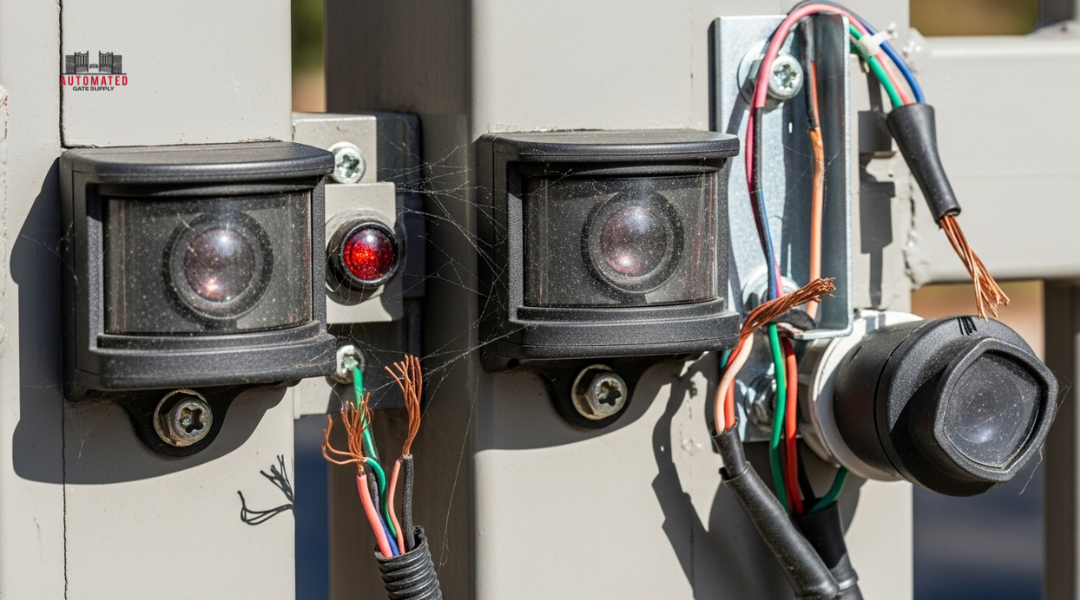
Clean the sensor lenses monthly. Dust, spider webs, and water spots block the infrared beam. Use a soft cloth with mild cleaner to wipe both sensor faces.
Look for physical damage to the sensor housings. Cracks or loose mounting brackets cause sensors to shift position over time. Weather exposure and lawn equipment impacts are common culprits.
Test the sensors by placing an object in the beam path while closing the gate. The gate should immediately stop and reverse. If it continues closing, the sensors need immediate attention.
Flickering Lights, Frayed Wires, Or Loose Brackets
Inspect all visible wiring for damage signs. Frayed insulation, exposed copper, or kinked cables indicate potential failure points that could leave your gate inoperable.
Check wire connections at sensors, control boxes, and junction points. Loose connections cause intermittent operation where your gate works sometimes but not others. Corroded connections appear green or white around metal contact points.
Look for flickering LED indicators on sensors or control panels. Steady lights mean normal operation, while blinking or dim lights suggest wiring problems or power supply issues.
Examine mounting brackets and conduit supports. Loose brackets allow wires to stretch or bend beyond their limits. Underground wiring conduits can shift with soil movement, creating stress points.
Watch for signs of animal damage. Rodents chew through wire insulation, especially in underground runs or enclosed spaces. Replace any damaged sections immediately to prevent complete system failure.
Step 5: Spot Electrical Red Flags
Gate operators rely heavily on electrical components, and problems often start with subtle warning signs like warm control boxes or occasional breaker trips. Water damage can cause immediate failures and safety hazards.
Breaker Trips Or Overheating Parts
Your gate operator’s electrical system should run cool and stable. If the breaker trips repeatedly, even once every few weeks, something is drawing too much power.
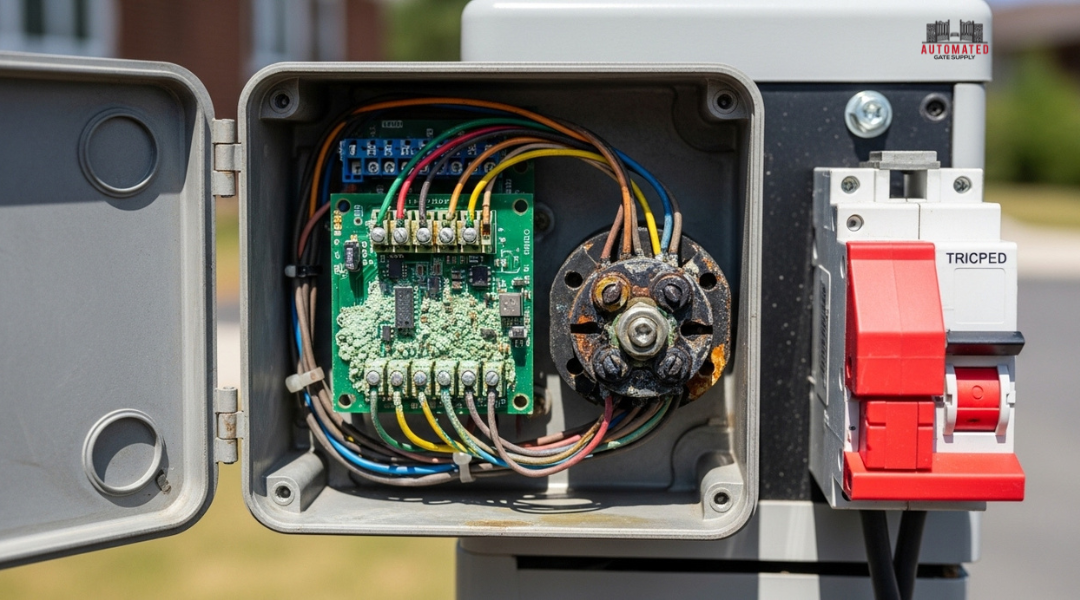
Check these components for excessive heat:
- Control box housing
- Motor connections
- Circuit boards
- Power supply units
Use your hand to feel around electrical enclosures during normal operation. Any component that feels noticeably warm compared to ambient temperature needs attention.
Common causes of electrical overheating include:
- Loose wire connections creating resistance
- Corroded terminals from moisture exposure
- Overloaded circuits from worn motor components
- Failing capacitors or relays
Don’t ignore breakers that trip and seem to work fine after resetting. This pattern often indicates insulation breakdown or component fatigue that worsens over time.
Motor connections deserve special attention. Loose terminals generate heat and can cause arcing, which damages surrounding components and creates fire risks.
Burned Smells Or Water Intrusion
Your nose can detect electrical problems before your eyes see damage. Any burning smell near your gate operator signals immediate concern.
Electrical burning smells often indicate:
- Overheated wiring insulation
- Arcing at connection points
- Failed electronic components
- Short circuits from moisture
Water is electricity’s enemy. Check control boxes, junction points, and conduit connections after rain or irrigation system activity.
Signs of water intrusion include:
- Rust or corrosion on metal components
- Water marks inside electrical enclosures
- Mineral deposits on circuit boards
- Condensation buildup in control boxes
Moisture creates slow, progressive damage. Even small amounts can cause corrosion that leads to connection failures months later.
Inspect weatherproofing regularly. Cracked gaskets, loose conduit fittings, or damaged enclosure seals allow water entry during storms or sprinkler operation.
Address water intrusion immediately. Wet electrical components can cause dangerous shorts or permanent damage to expensive control boards and motors.
Common Problems That Aren’t Failures
Many gate issues look serious but are actually simple fixes that don’t require professional repair. Blocked tracks and dead batteries cause most “broken” gate calls when the real solution takes just minutes to resolve.
Debris In Track Or Rollers
Leaves, dirt, and small rocks accumulate in gate tracks throughout normal operation. This debris prevents smooth movement and triggers safety sensors to stop the gate mid-cycle.
Check your tracks monthly for visible buildup. Pine needles and wet leaves stick to roller mechanisms and create grinding sounds that mimic motor problems.
Remove debris using these steps:
- Disconnect power to the gate system
- Clear large items by hand from tracks
- Use a stiff brush for stuck-on dirt
- Spray tracks with water to remove fine particles
- Check rollers for wrapped string or wire
Ice formation in winter months blocks gates completely. Pour warm water along tracks to melt buildup instead of forcing the gate to move.
Small pebbles jam between rollers and tracks. Listen for clicking sounds during operation as early warning signs of trapped debris.
Dead Remote Batteries Vs. Real Faults
Remote battery failure accounts for 60% of gate service calls according to repair technicians. Dead batteries create identical symptoms to serious electrical problems.
Test your remote before assuming gate failure:
| Battery Issue Signs | Actual Gate Problems |
|---|---|
| Remote LED light dim or off | Gate motor makes no sound |
| Works only when very close | Power indicator lights off |
| Intermittent operation | Manual operation also fails |
Replace batteries every 12-18 months even if remotes still work. Weak batteries send incomplete signals that confuse gate control boards.
Keep spare batteries in your car or home. Most remotes use CR2032 or 23A batteries available at hardware stores.
Test multiple remotes if you have them. When all remotes fail simultaneously, the problem lies with the gate receiver, not individual battery issues.
Programming can reset after power outages. Your remote may have full batteries but lost its connection to the gate system.
When DIY Is Enough (And When To Call A Pro)
Some gate operator problems need just a screwdriver and five minutes of your time. Others require specialized knowledge and can create safety hazards if handled incorrectly.
Simple Fixes: Clean, Tighten, Replace Batteries
Battery replacement is the most common DIY fix for gate operators. Remote controls typically need new batteries every 6-12 months. Your gate’s backup battery usually lasts 2-3 years.
You can safely handle these maintenance tasks yourself:
- Cleaning photo eyes with a soft cloth
- Tightening loose bolts on gate hinges and operator mounting brackets
- Removing debris from the gate track or roller path
- Lubricating chain drives with white lithium grease
- Adjusting limit switches using manufacturer instructions
Visual inspection helps identify simple problems. Look for loose connections, frayed wires, or corroded battery terminals. These often just need cleaning or tightening.
Track alignment issues sometimes resolve with basic adjustments. If your gate binds slightly, check for debris or minor misalignment you can correct with hand tools.
Most remote control programming follows straightforward steps. Your manual will guide you through syncing new remotes or keypads.
Serious Warnings: Heat, Repeated Shutdowns, Electrical Issues
Call a professional immediately if you notice burning smells, excessive heat from the motor housing, or sparks from electrical components. These indicate dangerous electrical problems.
Repeated safety shutdowns suggest control board malfunctions or sensor failures. Attempting repairs yourself could disable safety features that prevent injury.
Professional-only issues include:
- Motor replacement or internal motor repairs
- Control board diagnostics and replacement
- Electrical wiring beyond simple connections
- Structural gate repairs affecting weight distribution
- Safety system calibration after component replacement
Gas-powered operators require professional service for engine repairs, fuel system work, or exhaust problems. Never attempt engine repairs yourself.
Warranty considerations matter significantly. DIY electrical work often voids manufacturer warranties. Check your coverage before starting any repair.
Complex sensor problems need professional diagnosis. While cleaning photo eyes is simple, replacing or realigning safety sensors requires specialized knowledge to maintain proper safety function.