

When you invest in an automated driveway gate, convenience and security often take center stage. However, the most crucial aspect of your electric gate isn’t how smoothly it opens or how impressive it looks—it’s how safe it keeps you and your family.
Picture this scenario: your automatic driveway gate starts closing just as your child runs after a ball or your pet dashes through the opening. Without proper safety features, what should be a protective barrier becomes a serious hazard. The right safety features can prevent accidents, protect your property, and ensure your electric gates operate reliably for years to come.
You don’t need to be a technical expert to understand gate safety—you just need to know which features matter most. From sensors that detect obstacles to emergency controls that work during power outages, modern automatic driveway gates can be equipped with multiple layers of protection. Here are the essential safety features every automated driveway gate should have.
Step 1: Safety Sensors That Stop Accidents Before They Happen
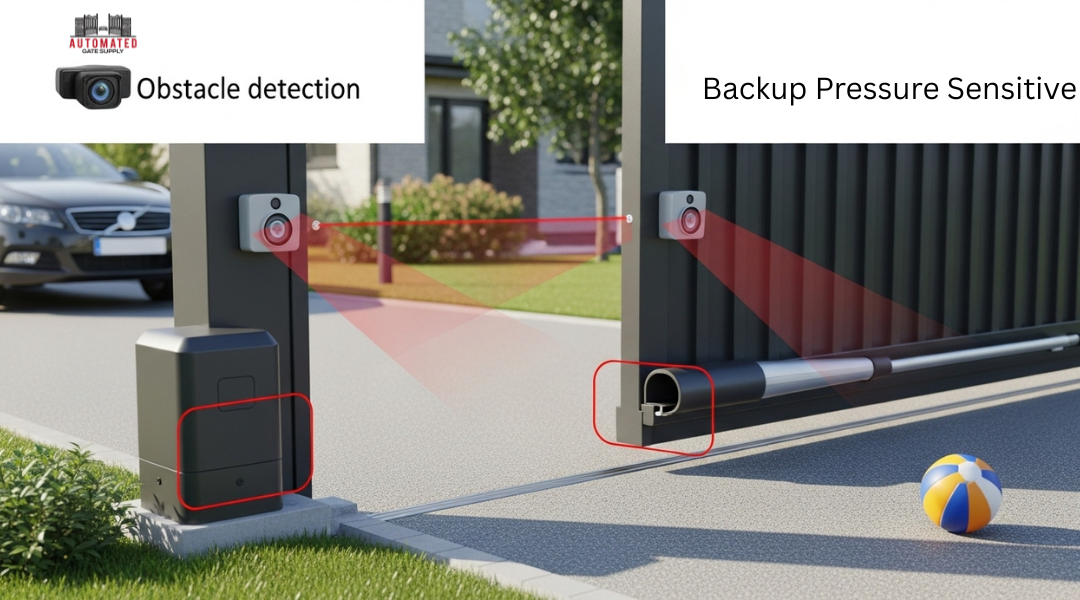
Safety sensors act as your automated gate’s eyes and hands, constantly monitoring for obstacles in the gate’s path. These devices detect everything from vehicles and children to pets before contact occurs, while pressure-sensitive systems provide a backup layer of protection.
Photo Eye Sensors (How They Detect Obstacles Like Cars, Kids, or Pets)
Photo eye sensors work by shooting an invisible beam of light across your gate opening. When anything interrupts this beam, the sensor immediately signals your gate to stop and reverse.
How the Detection Process Works:
- Transmitter sends infrared beam to receiver
- Beam breaks when person, vehicle, or pet passes through
- Gate stops within 1-2 seconds of detection
- System reverses gate direction automatically
You should install photo eyes at multiple heights for complete coverage. Place one set at 24 inches for children and pets, another at 36 inches for adults and larger objects.
The photoelectric sensor technology is reliable in most weather conditions. However, heavy rain or snow can occasionally cause false triggers when water droplets interrupt the beam.
Most systems include alignment indicators to help you position the sensors correctly. Red LED lights show when sensors are properly aligned and functioning.
Safety Edges and Pressure Sensors (Stopping the Gate When It Touches Something)
Safety edges provide physical contact protection when photo eyes fail to detect an obstacle. These pressure-sensitive strips attach to your gate’s leading edge and post areas.
Key Components:
- Rubber or foam sensing edge
- Internal pressure switches
- Wireless transmitter system
- Weather-resistant housing
When your gate contacts an object, the safety edge compresses and triggers an immediate stop signal. The gate then reverses 12 inches toward the open position to free any trapped items.
Safety edges excel at detecting soft objects that photo eyes might miss, such as clothing or flexible materials. They also work in complete darkness or during power outages when connected to battery backup systems.
Installation requires mounting the sensing edge along the entire gate width. The wireless design eliminates the need for running cables to moving gate sections.
Modern safety edges meet UL325 compliance standards and provide monitored operation that alerts you to system failures.
Step 2: Emergency Release and Manual Control
Power outages and system malfunctions can leave you trapped on either side of your gate. Manual release mechanisms provide immediate access without electricity, while backup battery systems maintain full functionality during brief power interruptions.
Manual Release Lever (Essential During Power Outages)
Every automatic gate requires a manual release mechanism that allows you to operate the gate by hand when the power goes out. This feature is typically a lever, key, or switch located near the gate motor.

The manual release disconnects the motor from the gate mechanism. Once activated, you can push or pull your gate open and closed manually. This prevents you from being locked in or out during emergencies.
Most common manual release types:
- Key-operated release – Requires a special key to activate
- Lever mechanism – Pull or push a lever to disengage the motor
- Switch-based system – Toggle switch releases the motor connection
Your gate manufacturer provides specific instructions for your model. Keep these instructions accessible and ensure all family members know the location and operation of the manual release.
Store the release key in a secure but accessible location. Consider keeping a spare with a trusted neighbor. Test the manual release quarterly to ensure it works smoothly.
Backup Battery Systems (Keeping Your Gate Functional in Emergencies)
Battery backup systems maintain normal gate operation during power outages without requiring manual intervention. These systems automatically switch to battery power when they detect electrical failure.
Standard backup batteries provide:
- 8-24 hours of operation depending on usage
- Full remote control functionality
- Normal safety feature operation
- Automatic recharging when power returns
Most systems use 12-volt sealed lead-acid batteries or lithium-ion batteries. Lithium options last longer and require less maintenance but cost more initially.
Battery systems work best for brief power interruptions. Extended outages will eventually drain the battery, requiring manual release as backup.
Replace backup batteries every 3-5 years depending on the type and usage frequency. Many systems include low-battery warnings to alert you before complete failure.
Consider solar charging panels in areas with frequent power issues. These systems can extend battery life significantly during daylight hours.
Step 3: Smart Access Controls and Security Locks
Modern access control systems eliminate security vulnerabilities while providing convenient entry options for authorized users. Automated locking mechanisms ensure your gate stays securely closed between uses, preventing unauthorized access attempts.
Keypads, Intercoms, and Remote Access
Keypad entry systems offer the most reliable primary access method for automated gates. You can issue unique numeric codes to family members, staff, or regular visitors. When someone no longer needs access, simply change or delete their code.

Most keypads feature backlit buttons for nighttime use. Weather-resistant models withstand rain, snow, and temperature extremes without malfunction.
Audio intercoms let you communicate with visitors before granting entry. The visitor presses a call button, and you can speak with them from inside your home or office. This prevents unwanted guests from gaining access to your property.
Video intercoms provide the same communication benefits with added visual verification. You can see who’s requesting entry through a live video feed. This feature proves especially valuable for properties with frequent deliveries or service visits.
Remote control systems give regular users convenient access within a specific range. Modern remotes use rolling code technology that changes the signal with each use, preventing code grabbing by potential intruders.
RFID card systems work well for commercial properties or homes with multiple authorized users. Each person receives a unique access card or key fob that activates the gate when presented to the reader.
Anti-Tailgating & Auto-Lock Functions for Added Security
Anti-tailgating systems prevent unauthorized vehicles from following authorized users through your gate. These systems use ground-loop detectors or sensors to count vehicles and ensure the gate closes after each authorized entry.
The sensors monitor the gate area continuously. If a second vehicle attempts to follow without proper authorization, the system triggers an alert or prevents the gate from closing until the area clears.
Auto-lock mechanisms engage automatically after the gate closes, creating a secure barrier against forced entry attempts. Magnetic locks provide the strongest security, using electromagnetic force to keep gates firmly shut.
Timer-based locking allows you to set specific lock engagement delays. This gives authorized vehicles time to fully clear the gate area before the locks activate.
Tamper detection features send instant alerts if someone attempts to force the locks or manipulate the gate mechanism. These alerts can connect to your smartphone or security system for immediate notification.
Battery backup systems ensure your locks continue functioning during power outages. Most quality auto-lock systems include rechargeable batteries that maintain security for 8-12 hours without external power.
Step 4: Built-In Safety Stops and Reversal Systems
Built-in safety stops and reversal systems act as your gate’s emergency brakes, automatically stopping or reversing the gate when it encounters unexpected resistance. These systems require proper sensitivity calibration to balance safety protection with reliable daily operation.
Automatic Reversal if the Gate Meets Resistance
Your driveway gate’s automatic reversal system detects when the gate encounters an obstruction during operation. The system monitors the motor’s electrical current and mechanical resistance as the gate moves.

When the gate hits an object like a vehicle, person, or debris, the resistance increases dramatically. The control system recognizes this change within milliseconds and immediately reverses the gate’s direction.
Key components include:
- Motor current sensors that detect electrical load changes
- Mechanical force sensors in the gate mechanism
- Control logic that processes resistance data in real-time
The reversal happens fast enough to prevent serious injury or property damage. Most systems can detect resistance changes as small as 15-30 pounds of additional force.
This feature works during both opening and closing cycles. Your gate will reverse direction regardless of whether it encounters resistance while moving toward the open or closed position.
Adjustable Sensitivity to Prevent Unnecessary Shutdowns
Sensitivity settings determine how much resistance triggers the reversal system. Proper calibration prevents false activations while maintaining safety protection.
High sensitivity settings make the gate reverse with minimal resistance. This provides maximum safety but may cause shutdowns from wind, minor debris, or normal operational friction.
Lower sensitivity settings require more resistance before triggering reversal. This reduces false alarms but may not protect against lighter obstructions like small children or pets.
Your installer should test different sensitivity levels during setup. The system needs calibration for your specific gate weight, motor power, and environmental conditions.
Adjustment considerations:
- Gate material and weight
- Local wind conditions
- Typical debris in your driveway area
- Presence of children or pets
Most modern systems offer 8-16 different sensitivity levels. You can fine-tune the settings seasonally if weather conditions change your gate’s operational requirements.
Step 5: Safe Design and Installation Practices
Proper installation techniques and ongoing maintenance form the foundation of gate safety, preventing dangerous malfunctions before they occur. Strategic design choices eliminate common hazards like sharp edges and misalignment issues that cause most gate-related injuries.
Smooth Edges and Pinch-Point Protection
Your gate contractor must eliminate all sharp edges and protruding hardware during installation. Swing gates pose particular risks at hinge points where fingers can become trapped between moving parts.
Professional installers use rounded edge caps on vertical pickets and posts. They position hinges to prevent access to pinch points during gate operation.

Sliding gates require protective covers over the track mechanism and motor housing. The gate’s leading edge needs beveled or rounded corners to prevent cuts during contact.
Install rubber edge strips along the bottom rail of both gate types. These strips compress on contact and provide visual warning of the gate’s movement path.
Your installer should examine all mounting brackets and hardware for sharp corners. Replace any components with exposed threading or jagged metal edges before final installation.
Proper Gate Alignment and Regular Maintenance Checks
Misaligned gates create dangerous binding conditions that increase motor strain and cause sudden jerky movements. Your gate installation team must verify perfect vertical and horizontal alignment before connecting automation systems.
Swing gates need precise hinge alignment to prevent sagging over time. Check that both gate panels meet evenly at the center latch point without gaps or overlapping.
Sliding gates require level track installation and proper wheel adjustment. The gate should roll smoothly without binding or lifting off the track during operation.
Schedule professional maintenance every six months to check alignment tolerances. Your technician will adjust hinges, wheels, and track positioning as needed.
Test emergency stop functions and safety sensor alignment during each maintenance visit. Document all adjustments and component replacements for warranty compliance.
Common Mistakes Homeowners Make With Gate Safety
Many homeowners underestimate the importance of proper safety protocols once their automated gate is installed. The two most critical oversights involve relying solely on basic motor functions and neglecting ongoing maintenance schedules.
Relying Only on the Motor Without Sensors
Your gate’s motor provides movement, but it cannot detect obstacles or people in its path. Motors operate on simple open and close commands without awareness of what lies ahead.
Photo-eye sensors should be installed at ground level on both sides of the gate opening. These create an invisible beam that stops gate movement when broken by a person, pet, or vehicle.
Pressure sensors detect physical contact with the gate itself. When someone or something touches the moving gate, these sensors immediately reverse the direction or stop movement entirely.
Loop detectors buried in the driveway can identify vehicles approaching from either direction. This prevents the gate from closing on a car that’s still in the opening.
Your gate should never operate without at least two types of sensors working simultaneously. A single sensor failure could result in serious injury or property damage.
Skipping Routine Inspections and Maintenance
Gate components wear down over time, and safety features can fail without obvious warning signs. Monthly visual inspections help identify problems before they become dangerous.
Check sensor alignment by walking through the gate opening while it closes. The gate should stop immediately when you break the beam. Misaligned sensors may not detect smaller objects or children.
Test emergency controls including manual release mechanisms and emergency stop buttons. These features must work during power outages or system malfunctions.
Lubricate moving parts according to manufacturer specifications. Worn hinges, chains, or tracks can cause erratic movement that overwhelms safety systems.
Professional maintenance every six months ensures electrical connections remain secure and software updates are installed. Many safety failures occur due to loose wiring or outdated control systems.
When to Upgrade or Add Safety Features
Knowing when your gate system needs safety improvements can prevent accidents and costly repairs. Modern safety technology offers affordable retrofit options that significantly enhance protection for existing installations.
Signs Your Gate System Is Outdated
Frequent breakdowns indicate your gate system needs attention. If you’re calling technicians every few weeks, the system has reached the end of its useful life.
Physical warning signs include:
- Gate reversing unexpectedly without obstacles
- Inconsistent response to remote controls
- Grinding or squealing noises during operation
- Visible wear on hinges, tracks, or mechanical components
Safety feature gaps pose serious risks. Gates installed before 2010 often lack modern safety standards. Missing photoelectric sensors, safety edges, or automatic reverse mechanisms create liability concerns.
Technology indicators suggest upgrades:
- No smartphone integration or monitoring capabilities
- Outdated control panels with limited programming options
- Lack of backup power systems
- Missing emergency release mechanisms
Your insurance provider may require specific safety features. Some policies mandate certain protections to maintain coverage. Check your current policy requirements against your gate’s existing features.
Affordable Add-On Safety Options That Improve Protection
Photoelectric sensors cost $150-$300 and install easily on existing gates. These invisible light beams stop gate movement when interrupted. Professional installation takes 2-3 hours.
Safety edges retrofit to gate perimeters for $200-$400. These pressure-sensitive strips reverse gate direction upon contact. They provide crucial protection against crushing injuries.
Emergency release kits range from $100-$250 depending on gate type. Manual override systems ensure access during power outages. Key-operated or lever mechanisms work with most automated systems.
Warning lights and signage improve visibility for under $150 total. LED warning beacons alert pedestrians to gate operation. Reflective tape enhances nighttime visibility.
Timer controls prevent gates from staying open indefinitely. These $75-$150 devices automatically close gates after preset intervals. They reduce security vulnerabilities from forgotten open gates.
Most safety additions qualify for DIY installation with basic electrical knowledge. However, sensor alignment and wiring connections benefit from professional setup to ensure reliable operation.